Why:
Parts are added to workshop orders if the parts are needed to complete the work on a vehicle.
Where:
Parts are added to a Workshop Order within the Order Details window. This is accessed by locating the order from the list in the Workshop Order View and double-clicking it. You can also highlight the order, right-click then select Open, or select Order from the menu bar then Open.
From the Parts Order View, highlight the order then select Actions > Parts Issue to WIP.
How to Add Parts to a Workshop Order:
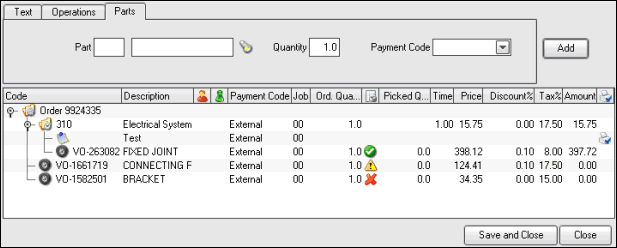
In the Order Details window, select the Parts tab. If the part number is known this can be entered, or you can search for it by selecting the search icon. Once you have entered the part number, enter the quantity and then click Add. Lines can be added to the order ‘root’ or to a specific operation that will appear arranged all together in a ‘tree’ format, as in the example shown below.

A ‘tree’ is built up by highlighting the line against where you would like to add further part lines. If you have highlighted a line and added parts in this way then the system will use the payment code information from the highlighted line. If part lines are not added to the order as a ‘tree’ format and the payment code is left blank then Fusion will use the payment code that is already set up for the customer, or assume that it is an external payment code.
Part lines can be removed from a workshop order by highlighting the line within the order lines section and right-clicking then selecting Delete > Part. However, the ability to do this depends upon the authority level allocated to your user ID.
If parts have been requested for a vehicle they can be added by selecting Order > Vehicle Parts. This will display a window listing all of the parts requested. To add any of these parts to the order, select Actions > Add to Order. If they’re any stock available then a message will be displayed and a back order created.
If an operation line was highlighted on the order when the requested parts were added, the parts will be added to this operation; otherwise they will be added to the order ‘root’.
Parts can also be added from the Work with Parts Kits window by opening the order and selecting Actions > Parts Kits, as well as from the Impact clipboard.
What else would you like to do?
Complete the Order and raise the invoice, see Invoicing a Parts Order.
Complete the Order and raise the invoice, see Invoicing a Workshop Order.
Related Topics:
Adding a Parts Kit to an Order.
Printing and Re-Printing Picking Slip.
Reserving Parts for a Vehicle.
Set up:
Authority to remove parts from orders is given in Control Files > Parts User ID Maintenance.