


Why:
Complementary business within GDS Fusion is a suite of enhancements introduced to the product which allows for more efficient handling and support of other franchises.
This user manual will discuss Multi-franchise processing which permits a dealer to invoice under different selling points; Mack, Renault, Volkswagen etc. This means that invoices with different manufacturer logo’s and layouts can be printed which are separate to standard Volvo template. Also mentioned is the possibility of submitting franchise warranty claims to a third party system via a generic XML interface.
Where:
The Invoice Completion, Submission of Warranty Claims and Claim Handling in Fusion are affected by Complementary business functionality.
Parameters:
Multi-franchise processing will be controlled by new system and branch parameters.
|
Parameter |
Purpose / Description |
|
INV160 |
This System Parameter - INV160 (POS/NEG variable). Multi-franchise handling determines if the functionality is set on within the system. |
|
INV161 |
This Branch Parameter - INV161 (POS/NEG variable). Franchise Selling Point, variable that dictates if branch participates in multi-franchise print or not. |
Setting Up - Franchise Selling Point Control File (FSP):
FSP control file is accessible from the control file menu and allows the setup of Franchise Selling points.
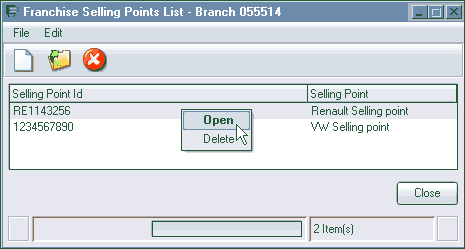
Click the New button  to create a Selling Point. Selling points
are not branch specific so require setting up one time only. Also, a Volvo
selling point does not need to be setup. The system will assume that a blank
selling point relates to Volvo.
to create a Selling Point. Selling points
are not branch specific so require setting up one time only. Also, a Volvo
selling point does not need to be setup. The system will assume that a blank
selling point relates to Volvo.
Selling Point ID is a 10 digit alpha numeric field. Selling Point will be a 50 character text box to store description. Data is stored in the THF714 file.
Setting Up - Product Code Control File Setup:
From the Product Code Control File, we can now assign the newly created Selling Point. Activate the Franchise code selector to activate Selling Point ID dropdown menu and select. Click OK and the product code will be set as a franchise.
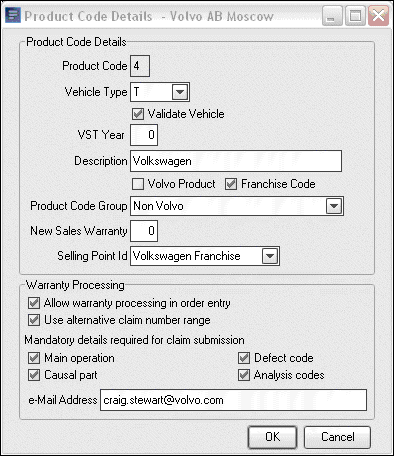
Warranty Processing attributes should only be completed when sending a Non-Volvo Warranty Claim.
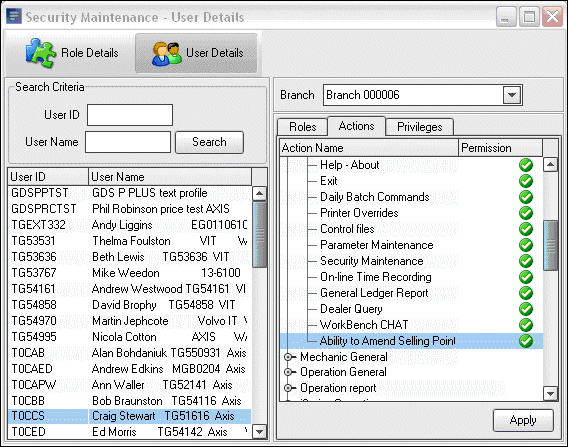
Setting Up - User Security:
Manual overrides are possible depending on setup in User Security. When activated it allows the user to override the franchise selling point with an alternative in the invoice completion screen. The security option is located in the Actions à General Options.
Using the System at the Workshop:
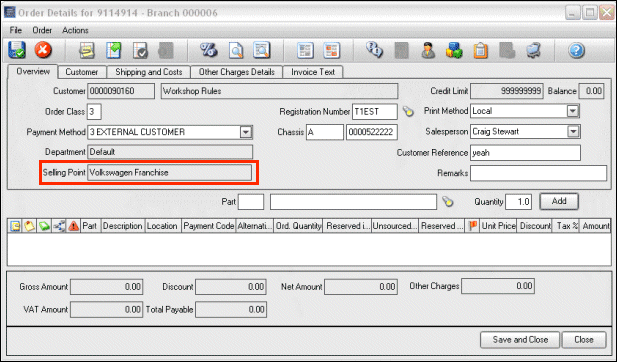
The system defaults the Selling point when creating an order using the product code set against vehicle. If the product code is recognised as a franchise, the Selling Point description from the FSP control file is copied into a new field in the Order Overview Tab. Otherwise the selling point is left blank - which by default means Volvo.
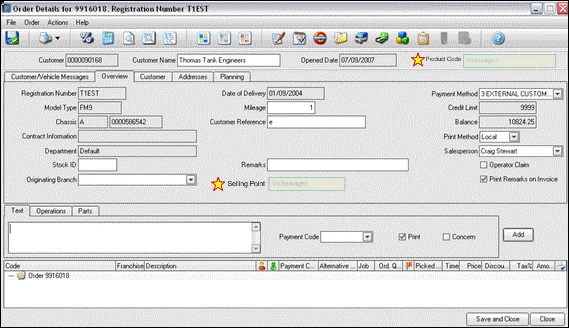
Product Code description has also been added to the Order Details window to assist with identifying different franchises.
If Multi Franchise is switched off at system or branch level, all selling point references are hidden.
Quotations, Pro-formas and customer returns will also adhere to the multi-franchise rules.
Any product code not setup as a Franchise selling point will load default logo and layout (Volvo).
The selling point cannot be changed within the order unless changing the vehicle. In this instance validation is again carried out on the vehicle product code and the selling point is overwritten accordingly.
Invoicing:
Order Details will behave as it does today, any special labour and part prices or discounts should be setup against product code as normal. Some additional warning messages have been introduced to warn when lines exist on the order and the vehicle / selling point is changed.
Clicking Print Invoice will invoke the invoice Completion user interface. The Selling Point is displayed and highlighted as a warning that an alternative layout is about to be printed. At this point and depending on the setup of a user, it is possible to override the selling point.
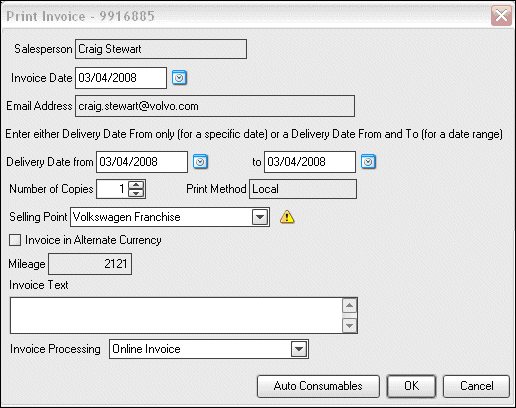
Clicking OK in this window will then store the selling point and order number to THF715, and the specified spool file with be selected and print the invoice layout and logo. Re-printing an invoice will check THF715 file to obtain selling point print thus printing the correct invoice layout.
Using the System for Parts Orders:
When creating a parts order, quotation or customer return, the program will calculate the Selling Point using the product code set against customer account (THF070.CRPRCD).
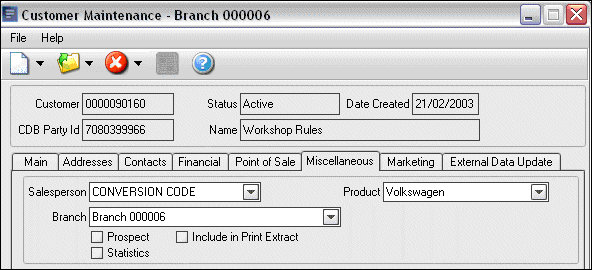
If the product code is setup as a franchise (plus system/branch parameter is POS) then in the Order Overview Tab a non-editable Selling Point field is displayed.
The selling point is non-editable unless invoking the Print Invoice window (Delivery Note outside the scope of Multi-franchise).
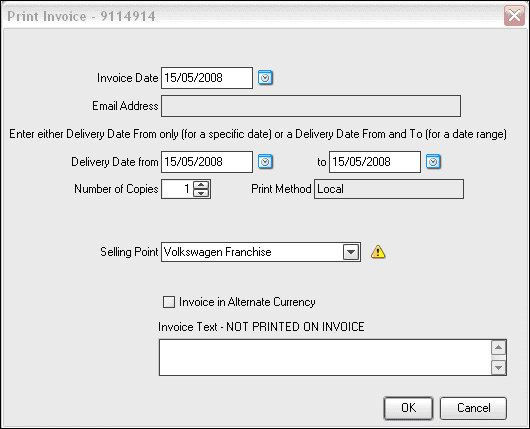
At this point and depending on the setup of a user, it is possible to override the selling point. Clicking OK in this window will then store the selling point and order number to THF715, and the specified spool file with be selected and print the invoice layout and logo.
Re-printing an invoice will check THF715 file to obtain selling point print thus printing the correct invoice layout.
Setting Up - Multi-Franchise Claims:
Franchise invoicing parameter must be switched on and branch parameters setup correctly (See above). Product Code table needs to have product code setup as FRANCHISE
Control Files: Setup Franchise selling point file as explained earlier and then open Product Code control file to assign selling point. Select Allow Warranty processing in Order Entry to process multi-franchise warranty claims in workshop order. The remaining Warranty Processing attributes require attention and are explained below.
• Allow warranty processing controls if warranty lines are allowed inside a franchise product repair order. Order handling will check that this is selected before allowing warranty type lines on an order against specified product code.
• Use alternative warranty claim number range overrides the standard warranty range with an alternative claim number range which can be setup in the Claim records control file.
• Mandatory claim details are objects that may or may not be mandatory in the Claim validation routine. Any checked items mean that the claim cannot be submitted without these items being entered in the Claim Details interface within Payment and Claim Handling.
• Analysis codes are 3 x 10 AN fields that are editable in the claim details GUI. Their main purpose is to allow the user to store any additional codes/notes – for example this could be mandatory information requested by the franchise importer like an extra set of defect codes etc.
• Email address is the 3rd party email that GDS will send warranty claims.
Claim Record Control File - Creating an Alternative Claim Number Range:
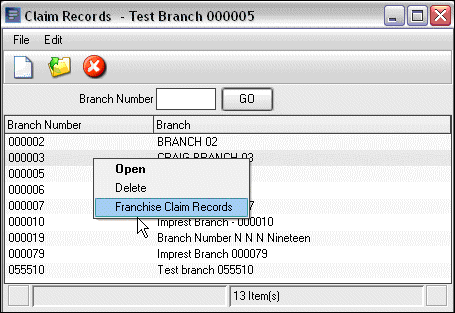
With Franchise Handling activated, a new right click function will be available in the Claims Record control file called Franchise Claims. Right click and select item to call Franchise Warranty Claim UI.
Franchise Warranty Claim Number Range: Click New to setup number range, Product is a mandatory field and will only display franchise type product codes.
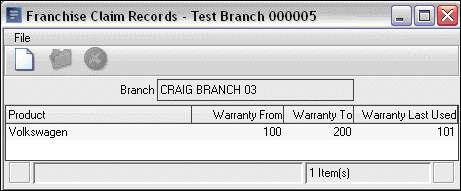
The new number range will be stored in the Claim Records file (THF222) along with the product code so that the program can differentiate between the alternative ranges.
Creating and Submitting a Claim:
A franchise vehicle will still invoke the warranty validation when raising a repair order. This checks if the warranty period has expired. based on the warranty details applicable to that vehicle held within the vehicle file. Adding warranty type lines is only allowed against the order when Warranty processing has been flagged in the Product Code Control File. If it is not allowed, then the repair order will prohibit the creation of any lines coded to warranty. Product Code is shown to help identification of franchises.
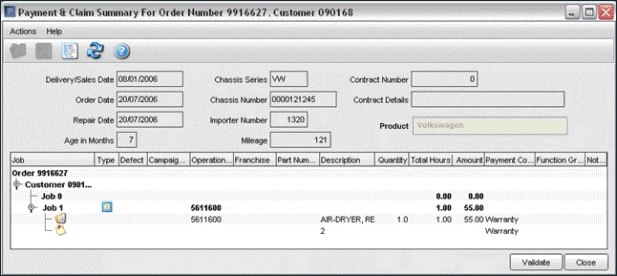
Updating claim information is done as normal in the Payment and Claim handling screen by double-clicking warranty job(s) or right click Open option. The claim details screen has three new analysis code fields, their purpose is to store any additional codes/notes entered by the user e.g. information requested by the franchise importer, such as an extra set of defect codes.
The control for this screen on which fields are mandatory is handled by the Product Code control file as mentioned previously. If Analysis Code is mandatory then the program should check that at least one analysis code has been recorded in TFF240.
All other fields in Claim detail screen are still active on franchise product codes. Data entered into these fields will be saved as normal but NOT sent in the export routine. All messages/checks will be suppressed by validation routine, other than the items flagged against product. The claim validation messages window will output all known errors and the user will have to add any missing details before the invoice will print. When the claim validation routine has been satisfied, an invoice can be generated. The invoice routine will allocate the claim number immediately and will calculate if the claim number should be the standard default or an alternative range.
When the order has been invoiced all claim information – including new columns Product & Analysis Codes - will be saved to the claim transmission file (TFF240) with a status code set to 6 – Not Sent. Franchise claims are also saved to the claim header file (THF065) with a status set to PENDING. At this stage claims have not been sent to 3rd party system.
Sending Claims to a 3rd Party:
Sending Claims is controlled by the Claims – Actions Menu - Select and Print routine in the Claim Workbench Actions menu. The menu will have two items, Volvo and Non-Volvo (if the Multi-Franchise invoicing parameter is switched off, the submenu is hidden). Select Non-Volvo to call the Send Franchise Claim GUI.
The objectives for the Send Franchise Claim GUI are:
• View summary of multi-franchise claims by product code.
• View summary of multi-franchise claims waiting to be sent to 3rd party.
• Execute instruction to send claims to 3rd party mail client.
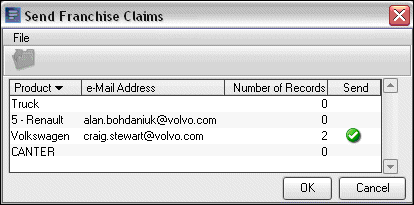
Here the Product column indicates Franchise Product codes set in the Product Code Control File. The Email address is also in the same file. The Number of records is the Number of claim lines waiting to be sent to the 3rd party (TFF240.JFSTCN=6). Finally, the Sendcolumn is a toggle feature which means to send / not send claims when OK button is clicked. If pending claims (not sent) exist then they will automatically have a green icon, to denote that they will be sent to the specified email address upon clicking the OK button. Clicking the OK button will create an XML file and send all the claims in the claim header, and with a green tick, to the specified email address. The program will output a confirmation message with feedback that the action has been carried out.
 Note! This will not mean
that the email has reached its destination, just that it has been sent. For
confirmation it is recommended that the email recipient is contacted directly.
The Email will arrive at it’s destination with a default description which can
be altered in the Email Control File – program name: TH3R9926 Non Volvo Warranty
Claims. The status code against claim in claim header file will have been
updated to ‘9’ meaning that the claim has been sent. (TFF240. JFSTCN)
Note! This will not mean
that the email has reached its destination, just that it has been sent. For
confirmation it is recommended that the email recipient is contacted directly.
The Email will arrive at it’s destination with a default description which can
be altered in the Email Control File – program name: TH3R9926 Non Volvo Warranty
Claims. The status code against claim in claim header file will have been
updated to ‘9’ meaning that the claim has been sent. (TFF240. JFSTCN)
Override Destination Email Address:
In the eventuality that the email address stored against the product code will not be answered, e.g. the recipient is on vacation / long term sickness. It is possible to over ride the email address with an alternative. To do this you should double click the product code in the Send Franchise Claim GUI. You are now allowed to change the email address for this transmission only. The email address set against product code will be unaffected, so the next time you come into the screen, it will still display the default e-mail address.
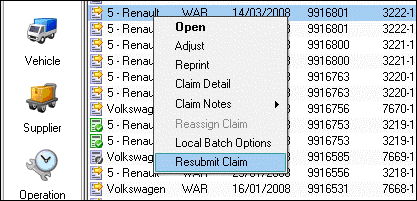
Resubmitting Franchise Claims:
In some instances users may want to be resend claims. This could be for many reasons, recipient on vacation, sick etc. To accommodate this requirement a new menu item in the Claim workbench is available when right clicking against franchise claims records. Records can be group selected to resubmit.
Selecting the item will initiate an update to the claim transmission file (TFF240) and change the (JFSTCN) status code from 9 (sent) to 6 (Not Sent). This will allow the updated claims to re-display in the Send Franchise Claims UI and be sent again as per the normal process.
Claim Reconciliation:
The claim workbench will highlight franchise claims as PENDING. Once the dealer has received a credit from the third party franchise, then a manual credit note can be created to change the status to PAID.
All claim reconciliation screens, reports, and views are selectable by product code, so franchise claims can be managed separately to Volvo claims.
Related Topics:
An XML schema is available upon request.