Why:
The setting up of this table allows an uplift factor to be applied to the local retail price at order line level. There is no change to the retail price on the parts master.
The system adds the calculated percentage to the local retail value before it adds the line to the order.
Where:
From the Control Master File view, select Price Uplift. This will display the Price Uplift Maintenance window.
How to Maintain Price Uplift Information:
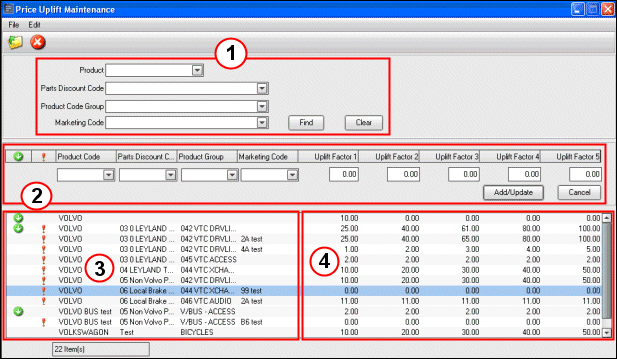
The following screenshot and texts describe the functionality of this table.

1. Matrix Element Selection - Here users will select the combination of matrix elements with which they wish to work. If no selection is made the list (in section 6) will include the whole uplift matrix. If a selection is made and the FIND button selected, the list (in section 6) will show only the uplifts below the selection.
2. The uplift values found for the given selection. These values may have been manually created as a group level uplift, or may exist as a result of being a subordinate to a group, or may be a manually created exception to a group. Values may be entered here to add or amend uplift levels. To delete an uplift, the check box should be selected. If the user chooses to delete the uplift, they also have the option to delete any exceptions if that uplift is a group uplift. If the user chooses to delete exceptions, and no exceptions exist, an error message should be displayed. The default option for both check boxes will be to not delete. Confirmation pop-up messages will be displayed for the delete actions, the text will depend on the combination of check boxes selected. If only the current uplift is selected for deletion, message “Delete Uplift” Y/N is displayed. If No is selected exceptions will not be deleted. If only the exceptions are selected for deletion, message “delete exceptions” is displayed. This will delete all exceptions to this group”. If both delete boxes are selected, message “Delete group and exception” is displayed. If a selection is made within the matrix.
3. Text is displayed if the uplift currently
displayed is a group level uplift, or an exception or both. The definitions
are:
Group: An uplift that can have lower level uplifts. The uplift defined
applies to any lower level combination unless an exception exists for a lower
level combination.
Exception: An uplift below a group uplift that is
different to the group uplift.
Both: An uplift that can have lower level
uplifts, but which is also an exception to a higher level group
uplift.
4. Where the selection represents a group level uplift, messages should be displayed to indicate the number of subordinate exceptions to this group.
5. This area lists all exceptions subordinate to the selected level. To amend a line either double click of select RMK and open. The uplift values will populate the fields at the bottom of the screen (section 7) , amend uplift values using tab and/or cursor keys. To delete a line highlight it and select the delete icon, alternatively select RMK then delete. Confirmation window is displayed to delete row yes/no. Fields displaying codes in this area will show text when hovered-over.
6. It should also be possible to add new uplifts by adding to the matrix directly, at the end of the list. Depending on the selection made in section 1, appropriate uplift criteria will be available in drop-down lists, and the user can enter uplift percentage values. By selecting the Update check box, a new ‘blank’ line will be made available for further entries to be added.
From order entry, if the customer has a classification code assigned to it which in turn has a price uplift flag attached to it, any parts sold where the product code, product group. Discount code, marketing code combination are registered in the price uplift control table, will have their prices uplifted by the specified percentage.
The implementation of the uplift factor is based on the following:
• The product code, Product Group, discount code and marketing code.
• The classification code attached to the customer.
• The uplift flags 1 to 5 and the percentage amount.
If Parameter CCO001 is positive, then the "Uplift Flag" on the customer classification codes control file option will be visible. This field can have values of blank (for no uplift) or values of 1 to 5 for uplift factors relating to those setup in the Price Uplift control table.
You can assign a classification code to a specific customer through customer file maintenance on the customer workbench.
To set up the percentages for the uplift, use the Price Uplift control table. Here, you can set up percentages for all combinations of product code, product group, discount code and marketing code. You can set up five different uplift factors for each combination.
Related Topics:
Customer Classification Codes.
For Customer maintenance information, see About the Customer Master File.