


Why:
DSP/LPA operates a buy back policy which allows dealers to return parts to the importer. This ensures that dealer stock figures are kept up to date and their stock valuation figures are as low as possible. The buy-back facility can also be used to return non-Volvo parts.
Where:
From the Part View, select Actions > Buy Back Handling. This will display a Buy Back Summary window.
How to Use Buy Back Processing:
The Buy Back Summary window lists all buy back transactions, both open and sent. Selecting a record displays a Buy Back Maintenance window. The screen defaults to tab 1 to allow the input of single part details. Selecting tab2 shows the contents of the Parts Master File in the left hand frame and any parts selected for buy back in the right hand frame.
To create a new buy back record, select File>New. This will display a Buy Back Maintenance window. Select tab 2 for the parts list on the left, select the parts that you want to return and the quantity. When you've completed your returns list, select Actions > Confirm. The status is now 'Sent'. A DSP transaction type D10 will be produced for Volvo and non-Volvo (and The Parts Master File 'Stock on Hand' figure will be updated). A financial record will also be sent to the accounting interface. Parts to be returned should be picked and packed and a transmission of returned parts and quantities is created. At the same time, the dealer stock is adjusted on the Parts Master File and then a credit note is issued by the importer (or supplier) to the dealer. From the Buy Back Summary window, open buy back records can be amended, confirmed and deleted.
 Note! Buy back transactions
are also sent automatically by DSP. A list of parts is sent to GDS via the Volvo
Dealer Data Bank. To view the list of parts access Buy Back in the usual way.
The list is presented to the dealer on screen so no manual input is necessary.
This will help speed up the way in which buy back parts are processed within Fusion.
Note! Buy back transactions
are also sent automatically by DSP. A list of parts is sent to GDS via the Volvo
Dealer Data Bank. To view the list of parts access Buy Back in the usual way.
The list is presented to the dealer on screen so no manual input is necessary.
This will help speed up the way in which buy back parts are processed within Fusion.
Parts can be added or deleted prior to the batch being confirmed.
Note! This must be done in
agreement with DSP
To add parts, enter a part pre-fix and part number, adjusting the quantity field as required then selecting the Add.
To Delete, highlight a part and select remove, confirm delete message is returned with the option to select Y/N. Selecting Y deletes part from batch.
When the buy back batch has been received there may be a discrepancy where the quantity of the buy back is greater than the available stock on the dealer parts master file. To confirm a batch from the menu bar select Actions>Confirm.
If the batch is confirmed before any action is taken to correct the discrepancy, the message ‘Error – Line Quantity Exceeds Stocked Balance or Original Quantity’ is returned to prompt the user about the error.
Highlight and double click the part in question to display the Update Part Detail window, this allows you to alter the quantity.
Where the stock on the parts master file has been reduced due to a buy back transaction being confirmed, but there is still stock on hand no changes are made to the location details.
If a part does not exist on the parts master file but is in the buy back batch, details of this will be written to an automatically generated report. Report THP436
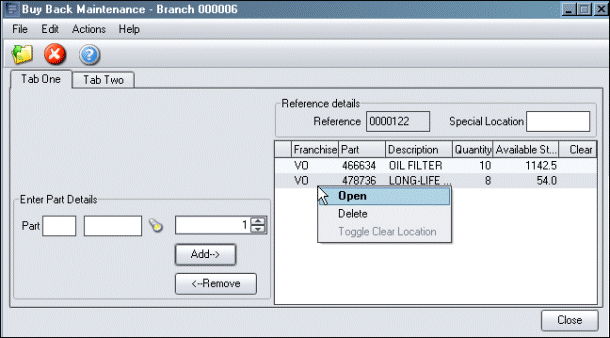
How to Change Location Details Before Confirming a Buy Back Batch:
When parts quantities are fully returned to Volvo or scrapped in connection with a Buyback, there is a need to clear bin locations for new parts and to improve parts information in GDS
In the buy back maintenance screen where the quantity and available stock are the same, the part line can be set to clear the location details on the parts master file. Highlight the specific part, right mouse click and select ‘Toggle Clear Location’, an indicator is displayed in the ‘clear’ column after selection. See the previous screenshot.
If the ‘Special Location’ field is populated, the details from here are written to the location field against the part in the parts master file. All changes will take effect once the buy back batch has been confirmed and sent to VIDB.
How to Clear Location Details:
As well as flagging a single part to clear and register a new location, all part lines within the batch can be flagged by selecting the ‘clear all’ option from ‘actions’ option on the menu bar.
When the buy back batch has been confirmed, any part lines that become zero on the parts master file will have the original location details removed leaving the location as blank unless the special location field is populated, then this will be written to the location field.
If the buyback does not cause the stock balance to become zero, but ‘Clear Location’ is checked, the warning message ‘Updated but not all locations were cleared. See report’ is displayed at the end of the process.
A report is produced with a list of the parts whose locations were not cleared.
After a buy back batch has been confirmed a report is automatically printed (THP436) with details of the old location.
Financial details include the value of a specific part line and the cumulative value of the part at replacement cost.
Subsequent copies of the report can be printed from the buy back summary screen.
Location history file is also updated with each location change.
Related Topics: