


Why:
‘Associated Selling’ helps to achieve additional sales when selling main part components. When a main component is sold, an associated parts list is displayed where the parts person can select which other parts are required. For each association an 'Associated Part Group' is required. Once this has been created the associated parts can be added. It is possible for a part to belong to more than one associated part group, so this function is particularly useful when selling components for different vehicle models.
Where:
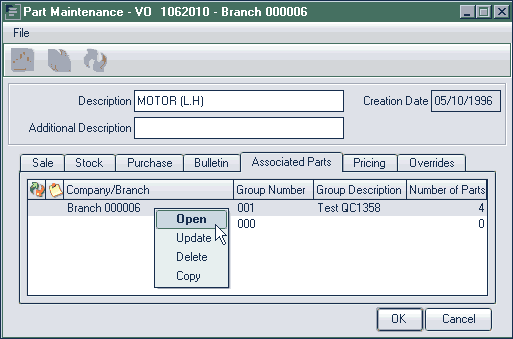
From the Part View select Actions > Associated Parts. This will display a Company View of Associated Parts window. From Part View, highlight a part, select Open>Associated Parts. This will display the Part Maintenance window opening to the ‘Associated’ tab. In the order entry routine, where associated parts are available the followjng text is displayed: Associated part(s) exist for this part. These will be processed, if required, after the part has been added to the order.
How to Work with Associated Part Groups:
To view all associated parts groups set up for the company, from the part view select Actions > Associated Parts. Here, groups can be updated, copied and deleted. To create a new associated parts group, open the parts maintenance window for the part that is to be the main component part. Select File > New > Associated Part Group. A drop down list box for branch is available, only the branch you are working in and company are available for selection. Enter branch and group description and click OK (if the branch number is left blank, the associated part group will be created for all branches). The new 'group' is automatically added to the list. When RMK is selected against a group, if you are working in branch 06 the options to open, update, delete and copy are available against company and branch 06 groups.
For all other branches open and copy is available, Update and delete is greyed out.
To add parts to a group, double-click the group and in the Associated Part Maintenance window, select File > New > Associated Part. Input the part number and quantity and click OK. Repeat this process until you have added all the parts you want included in this particular associated parts group. To remove a part from the group, in the Associated Part Maintenance window right-click it and select Delete. Please Note: ‘update’ and ‘delete’ of parts is not available against branches other than the one you are working in and company. ‘Copy’ function is available and used to copy back to your own branch or company.
How to Maintain Associated Part Groups:
To maintain associated parts groups, open the parts maintenance window for the main component part. In the Associated Parts tab double click the group you want to work with. This will display an Associated Parts Maintenance window that lists the associated parts. In this window you can add more associated parts, amend the quantities for existing parts or delete parts from the group.
How to Add Associated Parts Groups to Orders:
Add the main component part to the order. The following text is displayed: “Associated part(s) exist for this part. These will be processed, if required, after the part has been added to the order.” When the main part has been added, an additional Yes/No window is displayed. If Yes is selected the Associated Part Detail window is displayed with the option to apply associated parts to the order. Individual parts can be selected by right clicking part and selecting Apply. To add all parts right click the group and select Apply. The parts are transferred to a Pending Parts Lines window to be verified before being added to the order.
What else would you like to do?
Update Supersession Details for Associated Parts.