Why:
Inter-branch transfers are created when stock is being transferred from one branch to another. A transfer is deemed as complete once it has been accepted by the receiving branch.
Where:
From the Part View, select Actions > Inter Branch Transfer. This will display a Stock Transfers window. To create an IBT for individual parts, highlight a part from the part view, right click and then select Inter Branch Transfer. Select the branch you want the parts to be transferred to and the quantity.
How to Perform Inter Branch Transfers:
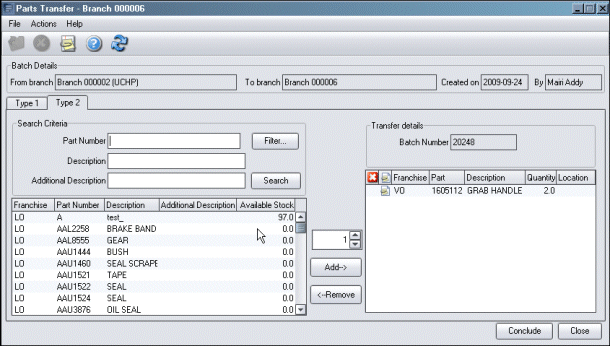
The Stock Transfer window lists all current inter-branch transfers. Completed transfers can be deleted by using the file reorganisation option. Stock transfers can be listed by using ‘From Branch’ ‘To Branch’ tabs. This is dependant on parameter settings and business practice within the market. The From branch/To branch view is available where parameter settings are positive, allowing a branch to transfer stock directly from another branch that they are not signed into. The icon to the left of each record indicates its status. To work with an IBT, highlight an open record from the list, select File > Open or right click and Open. Alternatively select the open icon or double click the record. Parts Transfer window is displayed. From here open records can be viewed, amended, picking slips printed and the transfer concluded. To create a new inter-branch transfer, select File > New or select New icon. This will display a Transfer Stock window: Select the branch you want the parts to be transferred to. Or depending on parameter setting being positive, select the branch you want to transfer stock from. The Parts Transfer Window is displayed overleaf with Type 1 tab for individual part entry and Type 2 for multiple part selection.

The controls in the centre of the window are used to add (and remove) parts to be transferred. Parts are selected from the list on the left and added to the transfer list on the right.
When you've completed your list of transfers, you can print a picking slip by selecting Actions > Print Picking Slip, or conclude the transfer by selecting Conclude. Concluding the transfer changes its status to 'Transferred' and updates the Parts Master File and Transaction Inquiry function for the sending branch. Until the transfer is concluded by the receiving branch, the quantity will have a status of 'Allocated' in the Parts Master File of the sending branch.
What else would you like to do?
Delete a Completed Transfer Using Reorganisation Functions.
Receiving an Inter Branch Transfer.
Related Topics:
Performing a Transaction Enquiry.
See The Parts Master File chapter.