


Why:
Access to the various functions in Fusion is controlled within the Fusion Security facility. Here it is possible to allow and / or deny a user access to a function.
Where:
From the Fusion Initial Panel, select Security Administration. This will open the Security Administration window.
How to Maintain Roles:
On the Fusion Initial Panel select Security Administration. This will present the ‘Security Maintenance – Role Details’ panel.
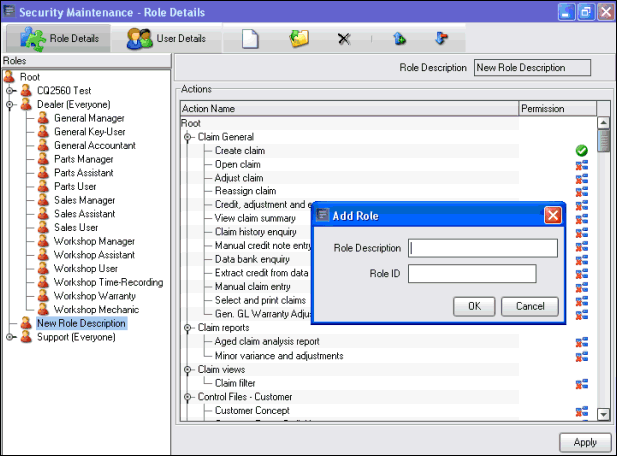
The Role maintenance allows a role (or template) to be setup with specific access rights which can then be used against an individual user, or a number of users. All subordinate roles are created under the Root. Roles can be created as a parent / child tree, for example Root, Dealer (Everyone) with specific roles such as General Manager, General Key-user etc. underneath. See example above.
Click on Root and all the Actions will display in the right hand panel. For Root there are no details in the Permission column. The list of Actions is fixed and can not be maintained from within this function.
How to Create Roles:
To create a new role highlight the parent Role, right click
on the Role and select New or select the New button  .
.
Enter the new Role Description and Role ID and click on OK.
This will create a new role under Root, or highlighted parent Role.
How to Delete Roles:
To delete a Role highlight the Role and then right
click on the Role and select Delete, or select the Delete button  . This will remove the Role from the tree.
How to Maintain Roles:
To maintain a Role, highlight the Role then double
click, or right click and select Open or click the Open button  . This will show a list of the Actions
available.
. This will show a list of the Actions
available.
To expand the list of Actions and show the Permissions,
click on the Expand icon,  This will expand all Actions, double
click on the required Action or click on the
This will expand all Actions, double
click on the required Action or click on the  . This will display a list of the
Options available for the Action which can be allowed or denied.
. This will display a list of the
Options available for the Action which can be allowed or denied.
To collapse the action details, double click on the Action
or click on the Collapse icon.
When the list of Options is displayed an icon will appear under the Permission column. The possible icons have the followinf meanings:
 Indicates that this Option
is Denied and inherited from the parent Role.
Indicates that this Option
is Denied and inherited from the parent Role.
 Indicates that this Option is
Allowed and inherited from the parent Role
Indicates that this Option is
Allowed and inherited from the parent Role
 Indicates that this Option
is Allowed and is different from the parent Role.
Indicates that this Option
is Allowed and is different from the parent Role.
 Indicates that this Option
is Denied and is different from the parent Role.
Indicates that this Option
is Denied and is different from the parent Role.
To change the permission for an Option, double click on the Option line. The permission icon will change and indicate the new value, Allowed or Denied. You must then click on Apply to complete the changes.
How to Maintain Users:
On the Security Maintenance panel, select User Details. This will display a list of user names.
The user name list is fixed by a control file called ‘Group Profile’ which is maintained outside of this function in Control Master File Maintenance. The ‘Group Profile’ control file contains Fusion User Groups which relate to the Group Profile or Supplemental Group allocated to the Users applicable to this environment, so, only users where the Group Profile or Supplemental Group matches a value in the ‘Group Profile’ control file will be displayed.
A user can be searched for by using either the User Id or User Name. Using the User ID will position the list at the User ID. Using the User Name will display only those users where the name matches the selection criteria.
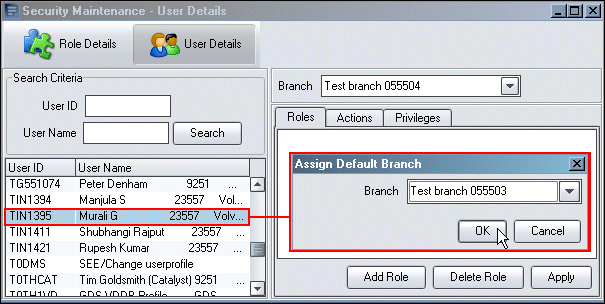
Right clicking, or double clicking on the User ID, will
allow the entry of the users default branch. Selecting a default branch
for a user will cause the branch to show as highlighted above, and with the icon
 , when the user selects the Fusion Workbench from the Fusion Initial
panel.
, when the user selects the Fusion Workbench from the Fusion Initial
panel.
Selecting a user will display the Roles / Actions / Privilege details for that user.
The Branch being maintained can be selected from the Branch drop down box.
To assign a Role to a User click on ‘Add Role’. This will present a list of available Roles (see How to Maintain Roles above). Select the appropriate Role for the User being maintained. If required, expand each Role by clicking on it. Once a Role has been selected click on Apply
To delete a Role assigned to a User, highlight the Role and click on Delete.
To maintain the Actions applicable to a User click on
Actions. This will then display the Root Actions which can be expanded /
collapsed by Double Clicking the Action or by clicking the icon. To Allow, or Deny, an Action for a
User, double click on the Option until the required permission is displayed.
Once the required permissions have been updated click on Apply.
Repeat for other Branches that the User has access to.
Selecting Privileges will allow the maintenance of Privileges for a User.
Privileges allow a user specific authorities which are not covered in the Actions, for example Allow Changes to Credit Limits etc. as described in the GDS Parameters document.
To update the Privilege for a user double click the Privilege until the required authority is displayed. Once the required Privileges have been maintained Click on Apply.
To update the Additional Information for a Privilege Right Click on the Privilege, this will show an ‘Additional Info’ tab, click on this tab and enter required details and OK. After adding the details click on Apply.
What else would you like to do?
Control Master File Maintenance.
Related Topics: